Setting up a Next Visit Campaign
This section, we will teach you how to setup a Next Visit Campaign.
A Next Visit Campaign sends Promotion Vouchers to a customer.
You may send the vouchers over the counter whenever you meet a customer, or bulk send it to a customer group or excel list of customers.
The vouchers expire X months from the date of issuing.
You will need to create the Promotion Vouchers first before creating the campaign.
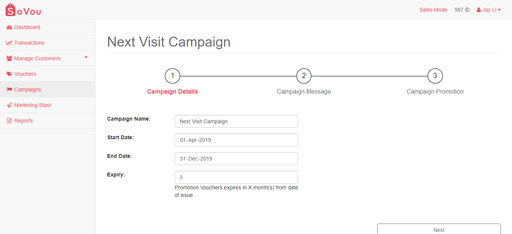
Campaign Details
Here you will be able to set the core details of your campaign.

Step 1: Enter your “Campaign Name”.
Step 2: Enter your “Start Date”.
Step 3: Enter your “End Date”.
Step 4: Enter your “Expiry” months.
Step 5: Click the “Next” button at the bottom right of the page.
The “Start Date” determines when you or your staff can start sending the vouchers.
The “End Date” determines when the vouchers will expire and the last day you or your staff can send the vouchers.
If the “Expiry” option is filled, the vouchers will expire X months upon issuing.
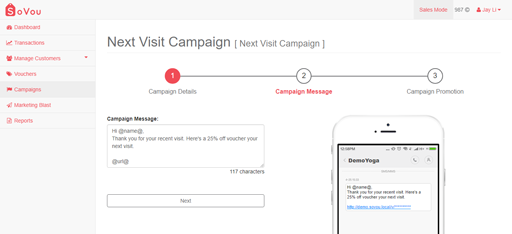
Campaign Message
Here you will be able to customise the SMS message of your campaign.

Step 1: Enter your “Campaign Message”.
Step 2: Click the “Next” button at the bottom right of the page.
@name@ – is where your customer’s name will appear.
@url@ – is where the promotion link will appear.
* 160 characters costs 1 credit.
* Try to keep the character count to below 160 characters, or below 140 characters if you’re using the @name@ marker.
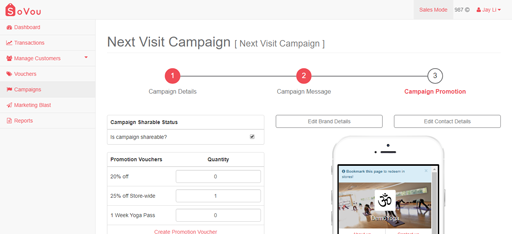
Campaign Promotion
Here you will be able to select the vouchers and set the quantity of the vouchers you want to send for the campaign.

Step 1: Check the “Shareable” checkbox if you want to add the “Share with Friends” button in your promotion link.
Step 2: Set the quantity of the vouchers you want to send for the campaign.
Step 3: Click the “Next” button at the bottom right of the page.


