Setting up your Admin Users
This section, we will teach you how to create, edit and delete admin user accounts and assign the correct access level for each your staff.

There are 4 roles or access levels that you can assign to a user account.
They are Brand Manager, Cashier – Issue & Claim, Cashier – Issue only and Cashier – Claim only.
| Roles | Description |
|---|---|
| Brand Manager | Have full access to all the backend features. |
| Cashier - Issue & Claim | Can issue & claim vouchers. |
| Cashier - Issue only | Can issue vouchers only. |
| Cashier - Claim only | Can redeem vouchers only. |
Cashier roles are for front end staff to run daily operations. They do not have access to other admin features such as creating campaigns, promotions, etc.
Brand Manager role are for your marketing managers or staff that handles and manages all the promotions for your brand. They can create new promotions and campaigns on the go and track the results of the campaigns.
Access your Users List
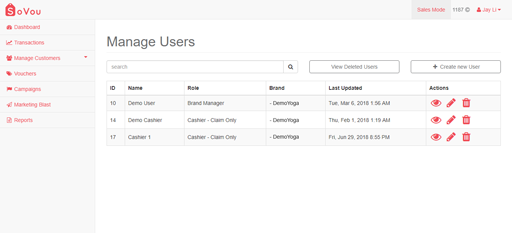
Here you will be able to see all your users, edit their access levels and delete their accounts if they are no longer around.
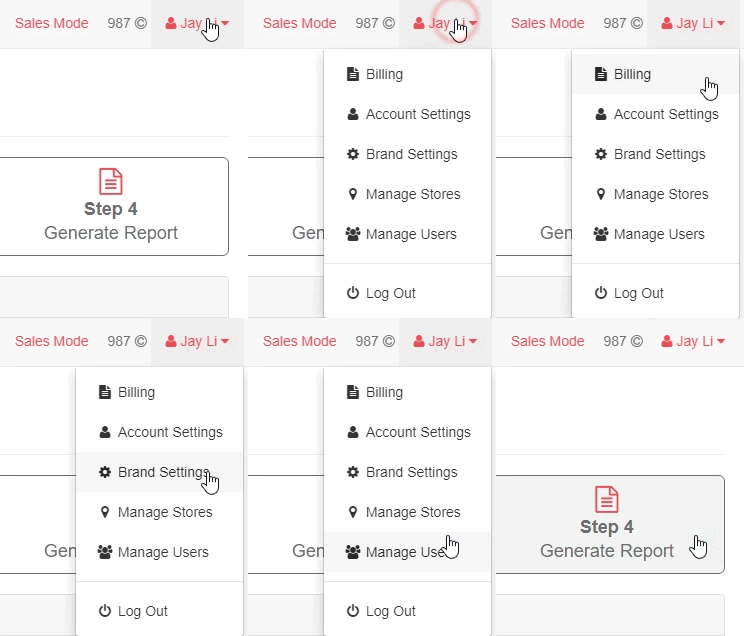
Step 1: Click on the “Manage User(s)” button at the top right drop down menu

Creating a new User Account
Every transaction is tagged to the user that did it. You’re advised to create a user account for every staff so when there’s errors, you can trace it back to the one that did it.
Step 1: Click on the “Create new User” button at the top right side of the page
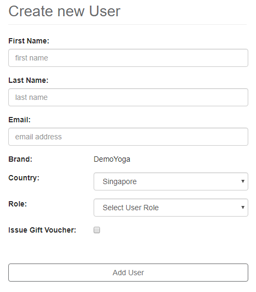
Step 2: Enter / Select your User information
Step 3: Click on the “Save” button at the bottom right side of the page
A welcome email with the user’s login credentials will be sent the the user’s email upon account creation.

Editing a User Account
If you need to reset their password, change their email, roles, etc.
Step 1: Click on the “Edit” button ( ![]() ) at the right side of the user record
) at the right side of the user record
Step 2: Edit the information you wish to change
Step 3: Click on the “Save” button at the bottom right side of the page

Deleting a User Account
Deleting a user account will remove his access to the system, but his transaction records will still remain.
Step 1: Click on the “Delete” button ( ![]() ) at the right side of the user record
) at the right side of the user record
Step 2: Confirm the action to delete the account
Editable Fields
| Fields | Input type | Description |
|---|---|---|
| First Name | Text | User's first name. |
| Last Name | Text | User's last name. |
| Text - Email | User's email, used for login. | |
| Country | Dropdown list | Adjusts the time settings to the user's country. |
| Role | Dropdown list | User's access levels. |
| Issue Gift Vouchers | Checkbox | Determines whether can user can issue custom quantities of Gift Vouchers. You will use this feature only if you’re selling Gift Vouchers for your business. |


